Posts

Showing posts with the label ink

salt Watercoloring technique

Image
Learn to make amazing backgrounds with salt, ink and water. Class is Tuesday, October 20, 6:30pm. Here's a few samples using it. If you can't make it to my Tuesday class I do a repeat on Wednesday at 10am. See ya then. Jackie

Tie Dye Technique is fun to do

Image
Here's a quick video of me doing the tie dye technique. I hope you like it. I had to hold the phone and "paint" the alcohol at the same time. I'm also entering the card I made in the SUO Challenge . Visit their website to see all the awesome projects that people post. I used Pacific Point and Coastal Cabana ink on Whisper White cardstock. Make sure you really ink up the paper. The darker the better. You can apply it however you want but for this one I put the lighter color in the centers and darker color around them.   Poor some rubbing alcohol in a bowl and use a paint brush to apply alcohol to your cardstock. Trace around the circles and add drops and dabs here and there. Watch the video to see how I did this.   Here's what it looks like when it's done. Then you can create a card with the finished piece.    I also did a few different ones. Take a look.   I made these two cards. I think they turned out cu

Weekly Deals August 5-11

Image
Alphabet Press Textured Impressions Embossing Folder Price : $7.95 $5.96 Bermuda Bay Classic Stampin' Pad Price : $5.95 $4.46 Delicate Designs Textured Impressions Embossing Folder Price : $8.95 $6.71

Open House is June 7th

Image
Want to double your money and get NEW Stampin' Up! products? Then come to my house this Saturday, June 7th, 10am-2pm. I'll have projects to make, retired items to buy including stamps, ink, markers, punches, rub-ons, paper and more. Plus check out my displays for Project Life, the new In Colors, Blendabilities, and MDS. I can't wait to share with you all the fun goodies, prizes, food and fun. Cost is $5 at the door. Here's some sneak peaks.

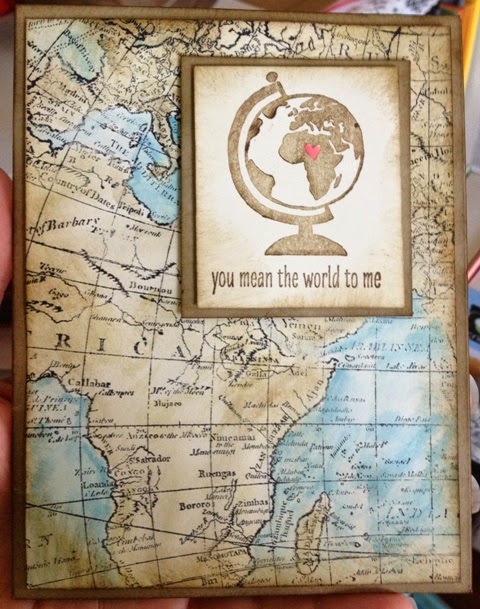
You mean the world to me!

Image
Here's a card I made for my hubby. He really does mean the world to me. I thought he would love the map background stamp. (Glad this stamp isn't on the retired list). Supplies: World Map  130345  Love You More   131853 Black Stazon Ink   101406 Crumb Cake Cardstock and Ink  120953, 126975 Marina Mist Ink  126962 Soft Suede Cardstock and Ink   115318, 126978 Real Red Marker  100052 Aqua Painters   103954 Sponge daubers   102892 (retiring) Do you know the trick of pressing the top of the ink pad lid into the ink pad? That's what I did and then used the aqua painter to get some color on the tip and color in the map. You have to make sure you use stazon ink to stamp the map so that the lines won't bleed. Hope you are having a blessed day! Thanks for looking. Jackie

Yikes! My Ink Pad is RUINED!

Image
When my two girls were still young one of them decided to get my ink pads out and stamp with them. One color was Pink Pirouette and one was basic black. I know right? You can see where this is going. After she stamped the image with the black ink she wanted to stamp it again with the pink. Being young she didn't know that you need to clean the stamp in-between colors. So the pink ink pad ended up having a black image on it. And yes I did yell that she ruined my ink pad. Luckily someone gave me information to save my ink pad from the trash can. If you are a fellow demonstrator I know how hard it is to let others use your stuff. You want it to stay perfect but that's not going to help others to learn this wonderful hobby. Starting off doing workshops and classes I realized that my stamps and ink pads were going to be used imperfectly. I soon decided to let it all go and not to worry. With that in mind take a look at how I found my ink pad after holding my open house. I w

scraps turned into cute card

Image
I finally got my camera back from my hubby. He needed it to take pictures of a house he is listing in Fairhope. I knew he might need it and should have downloaded my pictures before he took it but I'm really not that organized to plan ahead. So I was finally able to download the pictures of my messy desk and then of the card I made using the scraps on the counter. Here's the mess: I have been using the paper that came in the Add On Kit on page 30 of the mini catalog. I love these! The Gold paper is from this kit. It's so pretty and shiny! I keep trying to figure out ways of using it on cards. So I took a few different punches and layers a bunch of shapes and colors. I also needed to use the prints pack from the mini. I love this paper and it's great for Valentine's Day. Here's the card I made: I also stamped in Whisper White. I just bought some reinker for it and made sure it was good and juicy for stamping with. That's it for today. I ma

What's on my crafting table

Image
Well if you want to know what's on my crafting table take a look: This is just a small section of it too. So while I was cleaning up and putting away my crafts I had an idea. What if I showed you what my desk looks like every Wednesday and then on Thursday I show you what I made with the scraps I had on my desk. Sound fun? I think it would make me have more fun while cleaning up. So come back tomorrow and I'll show you what I made using what's on my crafting table. (and I didn't pull any extra paper out I swear!) The reason I had some scraps on my desk was because of this project I made. I think this will be my next card class. (See my events page for more info). I used new designer paper that I got out of the Mini Occasions catalog. It's so pretty. Plus I used a new embossing folder and punch. Makes this card easy to duplicate over and over. You could change it up and use whatever designer paper you have. Just have a coordinating cardstock and ink pad.

Masking Technique using By The Tide

Image
Here's a step by step on making the By The Tide card. By The Tide stamp set: 129120 Start with two post it notes and tear them in half. Attach them to the base (4" x 5 1/4") Get all your stamps attached to the clear blocks. This saves you time later when you are stamping a bunch of these cards so you don't have to keep attaching and removing them from one block. I love Stampin' Up! Ink Pads!!!  Make sure you start with the lightest color first just in case the color doesn't dry before you stamp the next image.  Leave your stamps on top of the ink pad so they are ready to use again and you won't get confused about which image is stamped with which color. I hate it when I accidentally stamp a dark color on a light color ink pad. Not pretty.  After all the images are stamped you are ready for the next part. SPONGING! If you have been to one of my classes you know you will be sponging and you will